Hello, Shiny! Part II
Daniel N. Albohn
12/06/2017
Shiny Gets Personal
In this section, we will make our shiny app a little more personal by having the user provide some input that will change the output within the app. We will start simple by having the user provide their name so that a personalized message appears.
More specifically, let’s try and build an app that a user is prompted to input their name, confirm via button press, and have the output greet them by their name.
App Layouts
Up until now, we have just been placing headers and text on the app. This is fine if you want a simple, left-aligned app that consists of pure text and images. But, once you start adding more complex features, understanding how an app is laid out on the page can make or break the user experience. There are several convenient and popular layouts that shiny uses:
sidebarLayout(): Provides a smaller sidebar (defaults to the left) and a larger area next to itfluidRow()(grid layout): Provides an easy way to subset a page into rows and columns usingcolumn()within the argumenttabsetPanel(): Allows for multiple sub-divided panels within a larger panel
You can see all types layouts in the shiny documentation online. However, be aware that this documentation is slightly outdated.
For this tutorial, we will stick with the simple/standard sidebarLayout(). Let’s update our shiny app to have a side-panel.
ui <- fluidPage(
  ## This should look familar
  titlePanel("This is my first shiny app!"),
  ## This is new!
  sidebarLayout(sidebarPanel(),
                mainPanel(),
                position = 'left',
                fluid = TRUE)
)
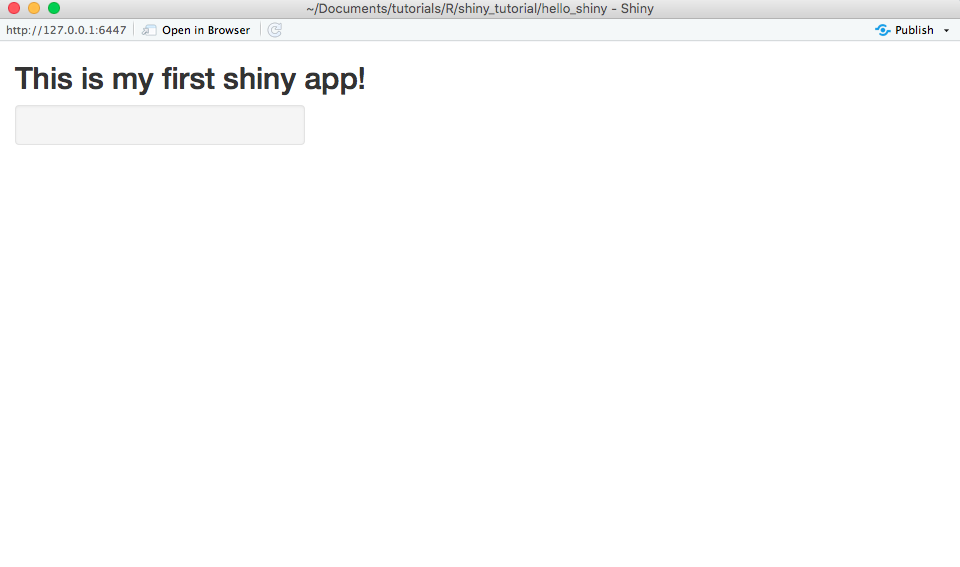
When we run our app now, we should see our lovely exclamation that this is our first shiny app, along with a demarcated subsection to the left, and a larger main panel to the right:

Notice how–like a lot of non-tidyverse R–we are nesting arguments within each other. That is, we are starting with the most broad object (the page itself), then move to a subsections of the page (the title and layout), etc…
Cateat: Order matters. Try switching the order of titlePanel() with sidebarLayout() and see what happens.
User Interface Redefined
User Inputs
Now that we have our app layout setup the way we want, we can begin to construct the reactive elements. Our first step is to provide some way for users to input some sort of text. Fortunately, shiny provides several common input/output functions.
Here, we add a textInput() function to the side-panel. There are many types of inputs that are included in the base version of shiny, such as numericInput(), sliderInput(), radioButtons() to name but a few.
ui <- fluidPage(
  ## This should look familar
  titlePanel("This is my first shiny app!"),
  ## This is new!
  sidebarLayout(sidebarPanel(
    textInput(inputId = "text", label = h5("What is your name?"), placeholder = "Enter text...")
  ),
                mainPanel(),
                position = 'left',
                fluid = TRUE)
)
The first argument in textInput(), inputId can be thought of as the variable name that the text will be saved as. When we want to access this variable, we will call is by this inpudId.
The second argument, label, is the display text for the input box.
The third argument, placeholder, is helper text inside the text box.
textInput() can handle other arguments, such as specifying the width of the text box, or defining and initial value. Check ?textInput to see what you can do!
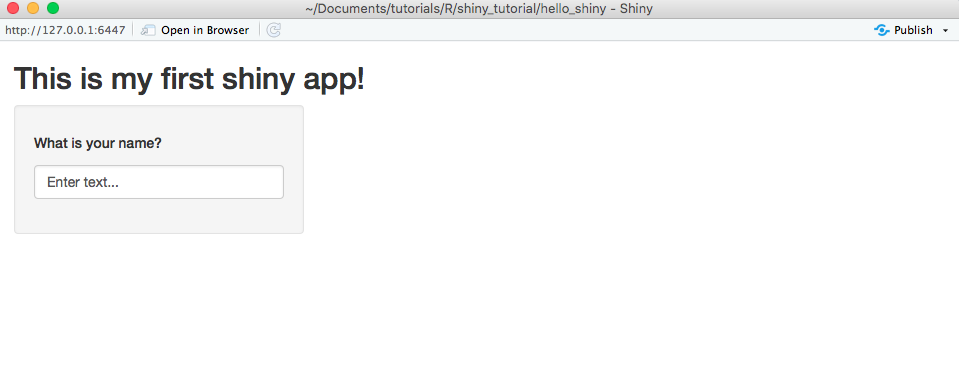
Nonetheless, at this point, our app should look like this:

Hey, now our app is starting to look more like an app! While we can enter text in our aptly named text box, there is still no way for the user to submit their response once they do so!
User Actions
The most useful user action function is actionButton().
ui <- fluidPage(
  titlePanel("This is my first shiny app!"),
  sidebarLayout(sidebarPanel(
    textInput(inputId = "text", label = h5("What is your name?"), placeholder = "Enter text..."),
    ## Building up our sidebar in the order we want the items to fill:
    ## Our text box with question above it, then our action button to submit
    actionButton(inputId = 'submit', lablel = 'submit')
  ),
                mainPanel(),
                position = 'left',
                fluid = TRUE)
)
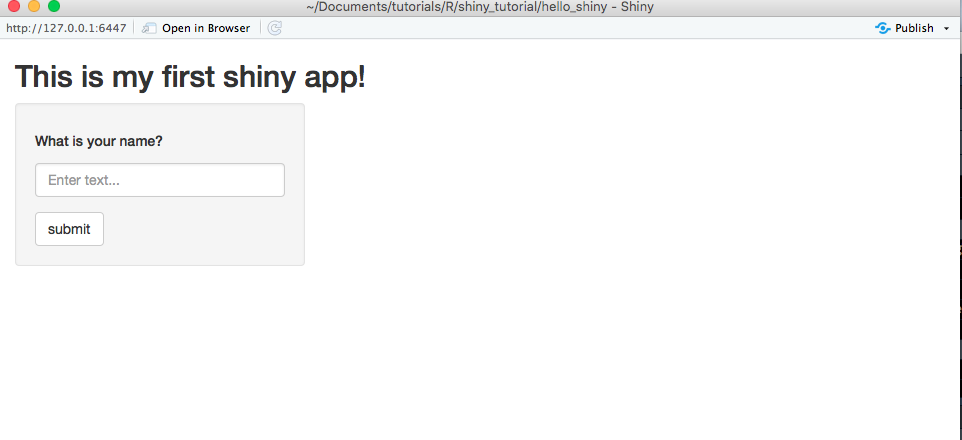
Like the textInput() function, the actionButton() function takes inputId and label arguments so that the button reaction can be identified and the button has some help text, respectively.

Hot dog! Except, it still doesn’t do anything when the user clicks ‘submit’ :(
Server Redefined
The other side of reactive programming is that once the app receives a user-defined response, the app actually does something with it! In this section, we will tell the app to take the supplied text and print a nice message for our user to enjoy.
Remember, since up until now we haven’t had any reactive elements to our app, our server function was pretty empty:
server <- function(input, output){
  ## Build how the app should react to the user/page here
}
However, the arguments that are provided to the function give us some hint as to what we should expect. Presumably, everything that is being passed back and forth between the UI and server is contained within input and ouput objects that are being passed as arguments to the server function.
From a coding viewpoint, we have to ask ourselves what we want our app to do in order to decide how to code it. Most simply, we want the app to take the user-defined input from our text box, concatenate it with some pre-defined message, and then display it. Recall, that in our UI code we have two actions that the user defines –the text box and the button. Both of these actions have the inputId argument as part of the their function. We can access these variables within the input object like we would any other object in R.
server <- function(session, input, output) {
  ## Build how the app should react to the user/page here
    output$name <- renderText({
      paste0('Hello, ', input$text, '! Have a fantastic day!')
  })
}
shiny provides a number of base functions that allow for reactive rendering of objects, including text, images, and plots. Here we use the renderText() function to take the user-defined text (stored in input$text) and paste it into a personal message that we store in our output variable as name.
If we tried to paste our input variable with out text variable the app would crash. This is because the app is expecting the text input that we defined in the UI to be reactive, and when we call for it outside of a reactive expression, it blows up.
Quick detour back to the UI
Go ahead and try to run the app with our updated server code. Despite defining some output, we still see nothing! What gives, man?! Well, we are missing one last piece of code. We need to print our name variable back on to the UI. shiny comes with several pre-defined UI output functions for text, images, and plots (seeing a theme here?):
ui <- fluidPage(

  titlePanel("This is my first shiny app!"),
  sidebarLayout(sidebarPanel(
    textInput("text", label = h5("What is your name?"), placeholder = "Enter text..."),
    hr(), # Horizontal rule, to space out our objects a bit more...
    actionButton('submit','submit')),
    mainPanel(
      ## Just stick this bad boy here...
      textOutput(outputId = 'name')
    ),
    position = 'left',
    fluid = TRUE)

)
The textOutput() function takes as its argument the variable name from the output object that should be rendered. In this case, we named it name.

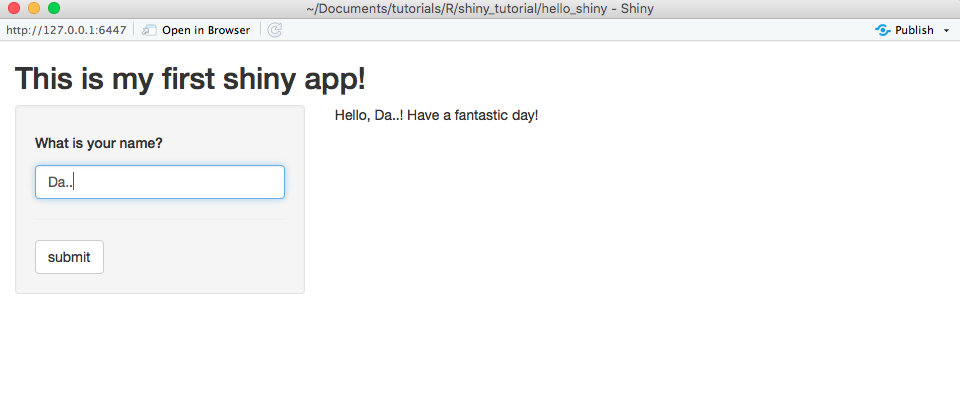
Looks good…wait, what? It is updating our message in real time and not waiting for the user to submit a response by clicking “submit”! But we went through all of that effort to include a button on our UI! It’d be a shame to waste it.
Making the app more…reactive
The last thing to do is have our app be patient and wait for the user to signal they are done by submitting their response via the button. This is achieved by setting up an “observer,” or an if-then statement that is constantly on the lookout for when a condition is met. In our case, we want our observer to trigger an action when a button “event” occurs.
We create an “observer” by calling the observeEvent() function. This function takes a reactive “event” (eventExpr) and what to do if that event occurs (handlerExpr) as input.
Recall that we cleverly gave our submit button an inputId of submit. Therefore, if our button event occurs (i.e., gets clicked), the parameter submit that exists inside our input object will be TRUE. The only other thing we need to pass to the observer is what to do when this event occurs, which we already defined above in the renderText() function.
server <- function(input, output) {
  ## Make an observer!
  observeEvent(eventExpr = input$submit, handlerExpr = {
    output$name <- renderText({
      paste0('Hello, ', input$text, '! Have a fantastic day!')
    })
  })
}
The final product (and what your app.R file should look like) is as follows:
ui <- fluidPage(
  titlePanel("This is my first shiny app!"),
  sidebarLayout(sidebarPanel(
    textInput("text", label = h5("What is your name?"), placeholder = "Enter text..."),
    hr(),
    actionButton('submit','submit')),
    mainPanel(
      textOutput('name')
    ),
    position = 'left',
    fluid = TRUE)
)

server <- function(input, output) {
  ## Build how the app should react to the user/page here
  observeEvent(eventExpr = input$submit, handlerExpr = {
    output$name <- renderText({
      paste0('Hello, ', input$text, '! Have a fantastic day!')
    })
  })
}

shiny::shinyApp(ui=ui, server=server)
Continue on to a more intermediate example
